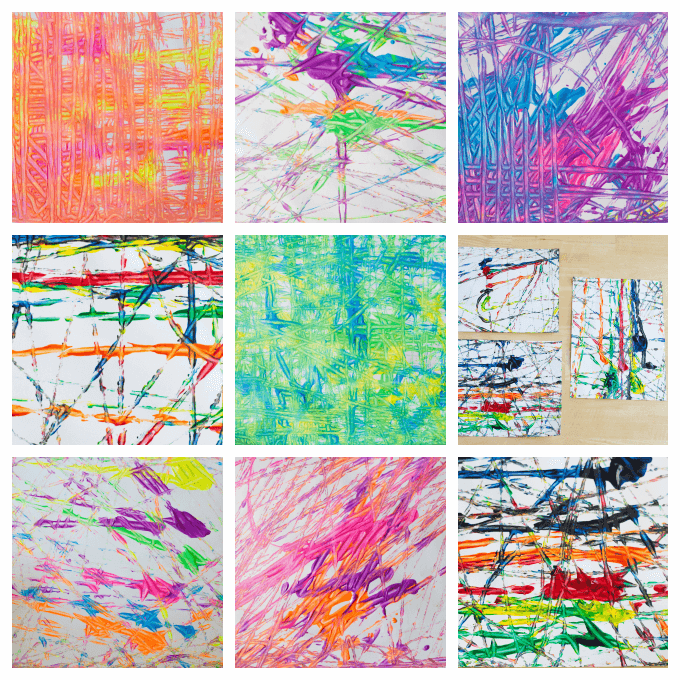
Create Jackson Pollock Inspired Art With Marbles

Today we’re going to make some abstract art! Using marbles and paint we can create beautiful one-of-a-kind artwork like Jackson Pollock’s famous spatter paintings. Don’t forget to send in your masterpiece so we can showcase it in the art show! [email protected]

Materials

Directions

  • Shallow cardboard box or a baking dish
  • Marbles
  • Paint
  • Muffin tin, egg carton, or small bowls to hold the paints
  • Spoons
  • Paper
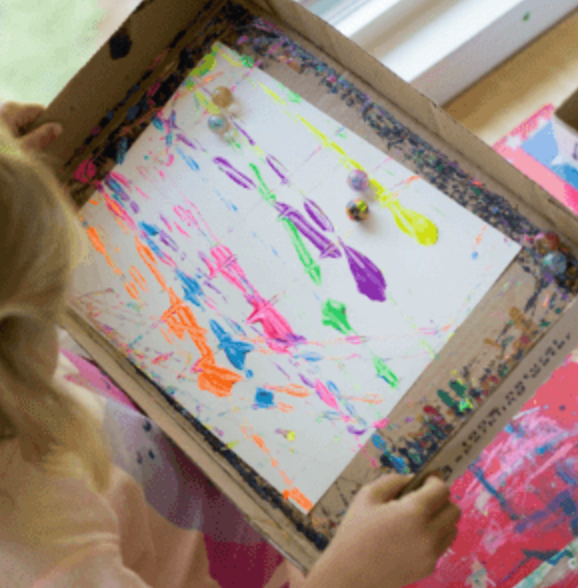
  1. Put different color paints in the muffin tin sections (or egg carton or bowls) and place a sheet of paper in your shallow box or baking dish
  2. Drop marbles into the paint colors. Use your spoons to mix them around so they get coated in the paint. (you can use as many or as little marbles as you like)
  3. Using your spoons, scoop up your paint covered marbles and put them into your box with the paper
  4. Start painting! Move the box around to make the marbles roll and paint a masterpiece!
  5. If you need more paint, drop marbles back into paint and repeat.

Home Made Strawberry Rollups

These fruit rolls up are healthy, delicious, and super simple! sesame snaps. 

Ingredients

  • 3-4 cups fresh strawberries trimmed
  • 1 tablespoon honey or more

Instructions

  1. Line a small baking tray with plastic wrap so it hangs over the edge a bit. Preheat your oven to its lowest setting.
  2. Puree all of your ingredients in your blender until combined. Spread into an even layer on your prepared pan.
  3. Bake 6-8 hours or until your fruit is no longer sticky to the touch. Start checking around hour 4. Slice and roll.

Tip: You can use strips of parchment paper when you roll them so they don’t stick together. Store them in the fridge or freezer!

Ice Cream in a Bag

I scream, you scream, we all scream for ICE CREAM! Memorial Day is this weekend, the perfect time to bring back this sweet summer treat. Even better? You can make it yourself—with just a bag!

Ingredients

  • 1 c. half-and-half
  • 2 tbsp. granulated sugar
  • 1/2 tsp. pure vanilla extract
  • 3 c. ice
  • 1/3 c. kosher salt
  • Toppings of your choice

Directions

  1. In a small resealable plastic bag, combine half-and-half, sugar, and vanilla. Push out excess air and seal.
  2. Into a large resealable plastic bag, combine ice and salt. Place small bag inside the bigger bag and shake vigorously, 7 to 10 minutes, until ice cream has hardened.
  3. Remove from bag and enjoy with your favorite ice cream toppings.

Make Smores with a Solar Oven

Supplies:

  • Cardboard box
  • Aluminum foil
  • Tape
  • Plastic wrap
  • Wooden skewer or stick
  • Box cutter or scissors
  • Graham crackers
  • Marshmallow
  • Chocolate bar

Directions:

Enjoy your delicious s’mores!

Cut a 3-sided opening in the top of your box using scissors or a box cutter. Lift up the flap and crease on the side that’s still connected to the box.

Cover the inside of flap with a large piece of aluminum foil. To keep the opening lifted, use a wooden skewer or stick.

Line the bottom of the box with aluminum foil.

Use graham crackers, chocolate and marshmallow to make your s’more and place it inside your box.

Lift the lid of the box and put a layer of plastic wrap over the lower section of the box, covering the opening. Use painter’s tape to make sure there are no gaps or holes in the plastic to ensure that you create a real greenhouse effect.

Place your solar oven outside in direct sun, positioning the top flap so that the sun reflects into the box.

Make a rain stick

It rains a LOT in the Amazon—that’s why it’s called a rain forest! Today we’re going to make our very own rain sticks so we can pretend we’re there exploring!

Supplies:

  • Paper towel roll
  • Sheet of paper
  • Piece of aluminum foil
  • Piece of plastic wrap
  • Popcorn kernels, dry beans, or rice
  • Tape
  • Markers and/or stickers

Directions:

Tip back and forth to hear the sweet sound of rainfall!

Crumple up a long, thin piece of aluminum foil and insert it into the paper towel tube. The aluminum foil will act as the barrier to keep the beans or popcorn kernels moving through the tube at a slow rate, making the rainfall sound.

Put a doubled-up piece of plastic wrap over one end of the paper towel tube, and tape in place.

Pour a tablespoon of dry beans or popcorn kernels into the open end of the tube, then seal the end with a doubled-up piece of plastic wrap. Tape plastic wrap in place.

Tape paper to the paper towel tube, then wrap around tube, securing end with tape.

Decorate with marker and stickers.

Chalk Paint Earth

Supplies:

  • 2 spray bottles
  • Paper
  • cornflour
  • food coloring or paint

Directions:

  • To make the chalk paint mix a cup of cornflour togetehr with a cup of colored water (you can mix some paint into the water or use food coloring). You will want to make one batch of green and one batch of blue. Mix it up good and pour into spray bottle.
  • Start spraying your paper! Use both colors to cover your paper.
  • Let your masterpiece dry and cut into a circle to create your Earth!

Yummy Earth-Day Dirt Cup

In honor of Earth Day, let’s make some chocolaty dirt cups complete with worms!

Ingredients:

  • 2 cups milk
  • 1 small box instant chocolate pudding
  • 1 package Oreos
  • 1 small tub Cool Whip
  • Gummy Worms
  • Clear cups (preferably)

Directions:

  1. Place 1/2 a package of Oreos in a Ziploc baggie.  If you have more than one cook in the kitchen you can split the cookies into multiple baggies so everyone can participate. Crush cookies up with hands or with a rolling pin.  You can leave the cream filling in or scrape it off.
  2. In a bowl, whisk together the pudding, milk, and about 2/3 – 1 whole tub of Cool Whip.  Allow it to set for about 2 minutes to thicken a bit. Stir again.
  3. In your clear cups, have your little helpers aid you in layering pudding and Oreos until you run out.
  4. Finally, top it all off with some gummy worms! Refrigerate until you’re ready to eat them! 

Easter Bunny Ears

The Easter bunny is coming THIS weekend! Get ready for a hopping celebration by making your very own bunny ears!


Supplies:

  • Construction paper in white and pink
  • Scissors
  • Glue
  • Stapler

Directions:

  • Glue the ears onto a long strip of construction paper, measure to fit your child’s head, and staple the ends together to form a headband.
  • Use white and pink construction paper to cut out bunny-ear shapes: two white and two pink, the pink being slightly smaller.
  • Glue the pink ears onto the white ears.

Easter Eggs Ornaments

Easter is just around the corner, time to decorate so a certain bunny knows how to find your house! With just three ingredients you can make these salt dough egg ornaments and let your kids decorate them!

Ingredients for Salt Dough:

  • 4 cups all purpose flour
  • 1 cup salt
  • 1.5 cups warm water

Directions:

  • Preheat your oven to 250 degrees Fahrenheit.
  • Combine all of your ingredients and knead for 10 minutes. If your dough is too dry add a little bit more water in and continue to knead.
  • Roll out the dough to a thickness that you’d like your salt dough ornament to be.
  • Cut out eggs (if you have a cookie cutter great, otherwise just use a knife and do your best!)
  • Using a straw, make a hole in the top for where you want to hang your salt dough ornament.
  • Bake for 1-2 hours. If your ornaments are still doughy, put back in for another hour. (It will depend on your thickness how long you need to bake for. The thinner ornaments will take less time but thicker may take more).
  • Once cool, you can decorate! Use paints, glitter, glue on materials, whatever you have, get creative!

Egg Carton Flowers

It may be tricky to get your hands on a bouquet of flowers these days but you can still make one! Brighten up this spring day with these easy egg carton flowers!

Supplies:

  • Paint
  • Egg carton
  • straws (substitute sticks from outside or pipe cleaners if you don’t have straws)
  • Pom poms (substitute acorns, pennies—anything round!)
  • Scissors
  • Glue

Directions:

  1. Adults, cut out four containers out of the egg carton. Trim around the edges so that it gives it a rounder shape for the petals of the flower.
  2. Squirt some paint colors onto a paper plate and have the kids paint their flowers. Use any colors you’d like. If you are using something other than a pom pom for your center, you may want to paint that too.
  3. After the paint’s dried you can attach the stem of the flower by gluing it to the back.
  4. Next choose a colored pom pom and glue that to the center of the painted egg carton
  5. Decide where to display your new flowers!